Caulking most often fails because of poor surface preparation, the wrong sealant for the joint, a missing backer rod, application in the wrong temperature, or rushing the cure. In Toronto, freeze and thaw cycles and summer UV add extra stress, so a joint sealed the wrong way can crack, peel or leak within a season or two.
At NHC Building Restoration, we have spent over 20 years providing Caulking Services in Toronto and the GTA for homes, condos and commercial buildings. We replace failed sealant around windows, doors, precast panels and expansion joints every season, so we see these mistakes up close. This guide explains why caulk fails, how to spot the warning signs, and which caulk works best for each job.
7 Common Caulking Mistakes That Cause Caulk to Fail
1. Poor surface preparation
Caulk needs a clean, dry and sound surface to bond. Dust, oil, moisture or bits of old sealant stop it from sticking, and the joint starts to peel within months. On caulking replacement projects like 4620 Guildwood Way in Mississauga, removing every trace of the old sealant is the first and most important step.
Quick Tip: Remove all old caulk completely, clean the joint, and let it dry fully before you apply new sealant. Some surfaces also need a primer, so check the product label.
2. Using the wrong type of caulk
Not all caulks do the same job. Acrylic latex caulk is easy to use indoors, but it cracks quickly on exterior joints that move with the seasons. Exterior joints need a flexible, weather resistant sealant such as silicone, polyurethane or a hybrid polymer. Joints around EIFS and wall panels also need a sealant that is compatible with the panel finish, and window perimeters need one that bonds to both the frame and the facade, as on our facade and window caulking at 2 Foresthill in Toronto.
3. Skipping the backer rod
On deep or wide joints, caulk needs a foam backer rod behind it. The rod controls the depth of the bead and stops the caulk from sticking to the back of the joint. Sealant stuck on three sides cannot stretch, so it tears as the building moves.
Did You Know? Sealant should only bond to the two sides of a joint. That is what lets it stretch and compress through Toronto’s hot summers and freezing winters.
4. Caulking in the wrong temperature
Cold slows curing and weakens adhesion, while extreme heat can make sealant skin over too fast. Most products list a minimum application temperature of around 4°C (40°F), and every product has its own range.
Quick Tip: Always follow the temperature range on the label, and avoid sealing surfaces that are wet or frosty.
5. Wrong bead size
Too little caulk leaves a thin, weak seal, while too much cures unevenly. On most exterior joints, the bead should be about half as deep as it is wide, at least 6 mm (1/4 inch), and tooled right away so it presses firmly against both sides of the joint.
6. Rushing the cure
Many caulks feel dry to the touch within an hour, but a full cure often takes 24 to 48 hours, and some polyurethanes take longer. Painting, applying an architectural coating or exposing the joint to water too soon weakens the seal.
7. Ignoring building movement
Buildings expand and contract every day. Exterior sealants are rated for how much movement they can handle, and this is often listed as a movement class under the ASTM C920 standard. A sealant with a low movement rating on a busy joint will crack early. Large joints, like the one between a new building and an existing one, often need a dedicated expansion joint system instead of standard caulk, as we installed at the Mandalay project.
What are the signs your caulking has failed?
Failed caulking usually shows up as cracks, peeling, staining or drafts long before water damage becomes visible inside. Watch for these signs around windows, doors, balconies and wall panels:
- Cracks or splits in the bead
- Peeling or gaps where the caulk has pulled away from the surface
- Mold, mildew or dark staining along the joint
- Hard, brittle or shrunken sealant
- Drafts or cold spots near windows and doors
- Water stains on interior walls after rain
If you notice leaks but cannot find the source, a professional leakage inspection can trace it before the damage spreads.
Which caulk should you use? The 5 main types explained
For most exterior joints, silicone, polyurethane or hybrid polymer sealants give the best results because they stay flexible through temperature changes. Acrylic latex works well indoors, and butyl rubber is best kept for roofing and flashing.
1. Silicone caulk:
- Best for: bathrooms, kitchens, windows and surfaces that will not be painted
- Pros: excellent flexibility, water resistance and UV resistance
- Cons: cannot be painted, and it is harder to remove later
2. Acrylic latex caulk:
- Best for: interior trim and areas you plan to paint
- Pros: easy to apply, paintable and cleans up with water
- Cons: less durable outdoors and prone to cracking with temperature changes
3. Polyurethane caulk:
- Best for: exterior joints, siding, concrete and expansion joints
- Pros: very flexible, strong adhesion and paintable
- Cons: harder to tool, slower to cure, and can break down in direct sun unless painted
4. Butyl rubber caulk:
- Best for: roofing, gutters, flashing and chimneys
- Pros: durable and bonds to many surfaces
- Cons: messy to apply and slow to cure
5. Hybrid polymer caulk:
- Best for: general exterior and interior use
- Pros: combines strengths of silicone and polyurethane, with good UV resistance, and most are paintable
- Cons: usually costs more
How long does exterior caulking last?
Many exterior sealants last roughly 5 to 10 years in our climate, and high quality silicones can last longer. The real lifespan depends on the product, sun exposure, joint movement and how well it was installed. A poorly installed joint can fail within a year, no matter how good the caulk is.
Several factors decide how long a joint actually holds up:
- Sealant type: silicone and hybrid polymers usually outlast acrylic latex outdoors, while polyurethane lasts longer when it is painted and protected from direct sun.
- Sun exposure: south and west facing walls get the most UV, so caulking on those sides tends to dry out and crack first.
- Joint movement: joints between different materials, such as windows set in brick or precast panels, move more and wear out faster.
Installation quality: proper surface preparation, the right backer rod and correct joint depth often matter more than the brand of caulk. - Weather: Toronto’s freeze and thaw cycles, heavy spring rain and summer heat put constant stress on exterior joints.
Because of these conditions, it is a good habit to check exterior caulking once a year, especially after winter, when joints have taken the most stress. Replacing sealant at the first sign of cracking or peeling costs far less than repairing the water damage that follows. Water that slips behind failed caulk can reach insulation, framing and concrete long before a stain appears inside, and on older buildings it often points to a wider need for waterproofing around windows, walls and joints.
Should you caulk it yourself or hire a professional?
Small interior jobs, like resealing a bathtub or kitchen backsplash, are usually fine as DIY projects. Exterior work is different, because larger joints move more and mistakes often show up later as leaks. Call a professional when:
- The joints are above the second storey or on a high rise building
- You are sealing windows, precast panels or expansion joints
- Water is already getting inside
- The job covers a whole building or a condo complex
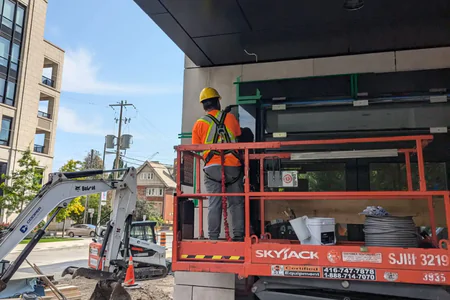
A professional crew removes the old sealant completely, installs the right backer rod, and chooses a sealant rated for each joint’s movement and exposure. On larger projects, the right access equipment is just as important. At The Quay on Queens Quay, our crews used swing stages, boom lifts, scissor lifts and rope access to seal precast panels and windows across a new high rise complex. At 395/405 Dundas Street West in Oakville, we completed high rise caulking, precast grinding and window sealing in five months.